GoPro, the Q-Tips of action cameras, recognized a problem. People are shooting tons of footage with their cameras, but are then letting it languish away on a dusty old hard drive, unseen and unedited. The California company is hoping to help correct that with new mobile apps and desktop editing software.
We recently got a preview of the new software while at the GoPro Mountain Games in Vail, CO. Here's a rundown of the new goodinesses. UPDATE:Studio 2.0 is now available. We've updated this article (originally published June 12th), with a bit of new info about the final version.
GoPro Studio 2.0
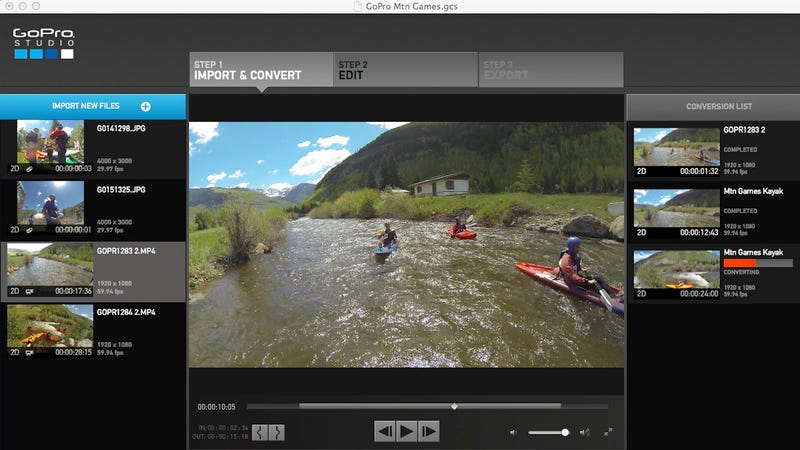
GoPro's video editing suite for desktops has been around for a while, but we suspect it doesn't get a ton of use. It is, essentially, a pared-down editing program, designed to make putting together your personal highlight reel easier. It provides a simple way to import footage, speed it up or slow it down, crop, and make image adjustments (like removing the fisheye lens distortion, or adjusting color or contrast). It's also handy for making a timelapse out of a bunch of stills, and perhaps best of all, it's much easier to work with footage shot at different resolutions/frame rates compared to even pro-level editing suites (no conversions required). The new feature, which actually might tempt people to use Studio 2.0 for action cam videos, is templates.
So, you know how GoPro has these amazing commercials and videos they put out? Some things are slowed down, some are sped up, and all the cuts are timed perfectly to the music. Most of us could never dream of cutting together a video that looks that good, because A) most of us aren't professional video editors, and B) even if we had the skillz, most of us don't have the time. Templates in Studio 2.0 basically takes the framework from one of those pro edits—music and all—and allows us to just drop in our own footage. It's a really good idea.
The process of making a video with a template goes like this:
Go through your clips, one by one. When you see a highlight that you want to include, you set an in point and an out point around it, then hit Convert Clip, and it will be added to a queue. This will convert that highlight into CineForm 444, a proprietary format designed to make video editing smoother (it's similar to Apple's ProRes in FinalCut). You can pull multiple highlights from the same clip, one at a time. Once you've gone through all the footage and pulled out your best bits, you convert the whole queue at once. This process is the same as it's always been. It takes some time to go through your footage—there's still no getting around that.
Here's where the fun starts. Hit Templates, and up pops a list of 4 preloaded templates, or you can choose to download nine other options. They are templates for some of GoPro's more popular videos, like Alana Blanchard surfing, or the Baby cam Superbowl commercial. Each one tells you how long the finished video will be and how many separate cuts go into it (see image above). Choose the one that best matches the amount of footage you have and length you want to end up with. For example if you've just got a few highlights from a bike ride, you can probably just pop them into the 30-second 4-cut template. If it's a whole weekend's adventure, maybe you want to go for the a two-minute 40-cut template.
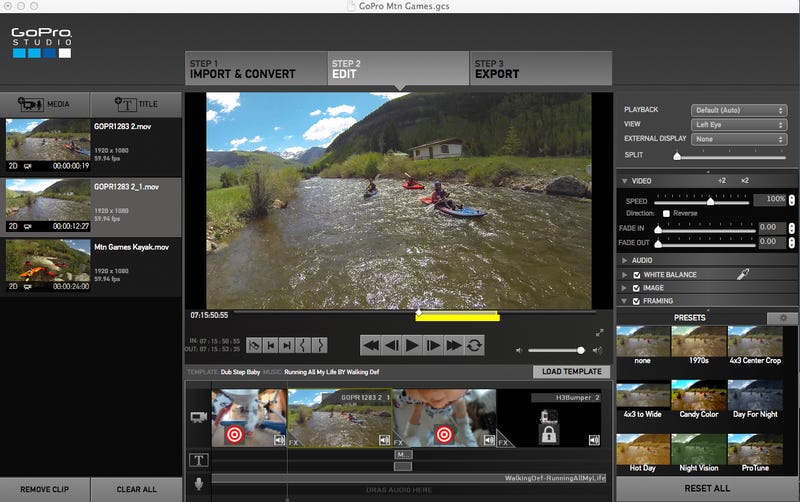
Once you've picked the template you want, it opens up a timeline that looks like any other video editor, except the timeline is pre-populated with GoPro's clips from the original video. Each of those clips has a bullseye on it, which means you can drag one of your highlights onto that clip, which replaces it. The timing of the cuts and the motion properties (such as slo-mo) from the original sequence are preserved, but now it's your footage instead of theirs. Once it's in there, you can drag the start point around within the clip, so you make sure the best part is included. It's all extremely intuitive.
Once all of GoPro's clips are replaced with yours, you click Export. There are a bunch of built-in templates for export, too, which are made easy for the lay-person to understand. “Best for YouTube,” “Best for Vimeo,” “1080p,” stuff like that. There's “Custom,” too, if you actually know what you're doing. Once it exports, you're ready to upload it to wherever you want.
UPDATE: We got an early hands-on with the final Studio 2.0 software (to be released tomorrow), so I used that as an opportunity to cut together some footage I had from my buddy John's bachelor weekend raft trip. It took about an hour to log the clips, and maybe another hour to cut it together, if that. Given the small amount of time it took, I'm pretty pleased with the results:
There are a few caveats with the templates. You're stuck with the music in the original commercial. It's not that the music is bad, it's just that with thirteen templates at launch, we're going to start seeing a lot of action cam videos set to the same music. You also have GoPro branding at the start and end of the video (not replaceable), which makes your masterpiece feel a bit like a GoPro commercial. Naturally, GoPro likes it like this. The more people they have making commercials for them (for free) the better. Sure, you could take the export, put it into some other editing software and cut that out, but most people probably won't bother. UPDATE: The GoPro branding can now be replaced.
Of course, if you have video editing skills and don't mind investing the time, keep doing it yourself. The templates are really aimed at beginners and people who might shoot some awesome stuff, but then don't know how to cut it into something compelling. The idea is to enable more people to upload and share polished-looking videos, and if it works, then that's a cool thing. Personally, I have a hard drive full of action camera footage, but I've never felt like devoting the time or energy to making something really good out of it. But hell, I'd take an hour or two to make something if it's that easy. It's certainly better than it just sitting there doing nothing.
It should be noted that it's definitely not a perfect solution. It's gotten a lot better since our original hands-on, but there's still some pretty unintuitive behavior. For example, you can't drag a clip from one place on the timeline to another. Or if your clip isn't long enough to fit in a section, rather than slow it down and thus stretching it to fit (which is perhaps what you intended) it will simply block you from dropping it. So you have to go back to step one, re-convert a longer version of the clip, drag it back in, and thenslow it down. The title editor isn't particularly user-friendly, either.
These are mostly small gripes, though, and all of them could be improved with quick updates in the future. In the meantime, make sure you check these tips from professions for getting the best action camera footage.
GoPro - Quik | Desktop
'via Blog this'


